
Review & Guides
Last Update August 11, 2025
Author: 花舞组, Admin| English Translator: Admin
Overview:
Tempest - Parvati is a Wind element, Asterism Modifier who can function as a main DPS or support.
In the current Global meta her support role is stronger, particularly as a dedicated support for Trimūrti - Brahmā. Her general Wind support is less effective than Luliang’s. Main DPS strength is average and not highly recommended.
In the CN meta, her DPS role is significantly stronger than support, though survival is still shaky (improved slightly by Linyu), solo DPS remains average, better paired with Brahmā.
Sigil Recommendations:
- Support Build:
- Slots 1, 2, 3: [Blazing Scarab] for warp utility.
- Slots 4, 5, 6: [Jonah's Echo].
- No Luliang/Linyu: Replace 1, 2, 3 with [Pixiu's Fortunes].
- Omega Sigils: Slots 2, 3, or 2, 5 with [Barren Flower].
- DPS Build:
- Slots 1, 3, 5: [Frozen Embrace].
- Slots 2, 4, 6: [Acheron's Obol].
- Advanced: Replace 2, 4, 6 with [Swordsman's Creed]. Trigger Dodge before Ultimate Skillchain to snapshot +75% Crit Rate (3s, Brahmā’s middle Aether Code uses snapshot). Dodging after Skillchain is ineffective. Avoid >200% Crit Rate (Parvati’s base + functor + Swordsman + Brahmā’s +25% + Linyu weapon/Linyu Aether Code).
- Omega Sigils: Slots 2, 3, or 2, 5 with [Barren Flower].
Sigil Enchants:
Replace [Berserk] with other DMG-focused enchants if Crit Rate exceeds 200% (Brahmā Red 3 cap).
Aether Code Recommendations:
- Support: Blue - Tempest Gale
- DPS: Yellow - Cyclic Peak
Warp Recommendations:
- Support:
- Slots 1, 2: [Power UP: Ranged] and [The Judge] + [The Executioner].
- Slots 3, 4: [Savage], [Telepathize Forcefield I].
- Slots 5, 6: [Armor Breaker], [Aether Shatter].
- DPS:
- Slots 1, 2: [Power UP: Ranged] and [The Judge] + [The Executioner].
- Slots 3, 4: [Savage], [Telepathize Forcefield I], [Evolution Particle II].
- Slots 5, 6: [Evolution Particle III], [Telekinesis Vector III].
- SSS or Manual-Controlled: Replace one Slot 3/4 with [Divine Sense] (faster Crimson stacking). At SSS, use one [Divine Sense] and one [Armor Breaker]/[Aether Shatter].
Signature Functor (Synchronic - Anavatapta):
- Priority: High for DPS, not recommended for support.
- Effects:
- +12% Independent DMG.
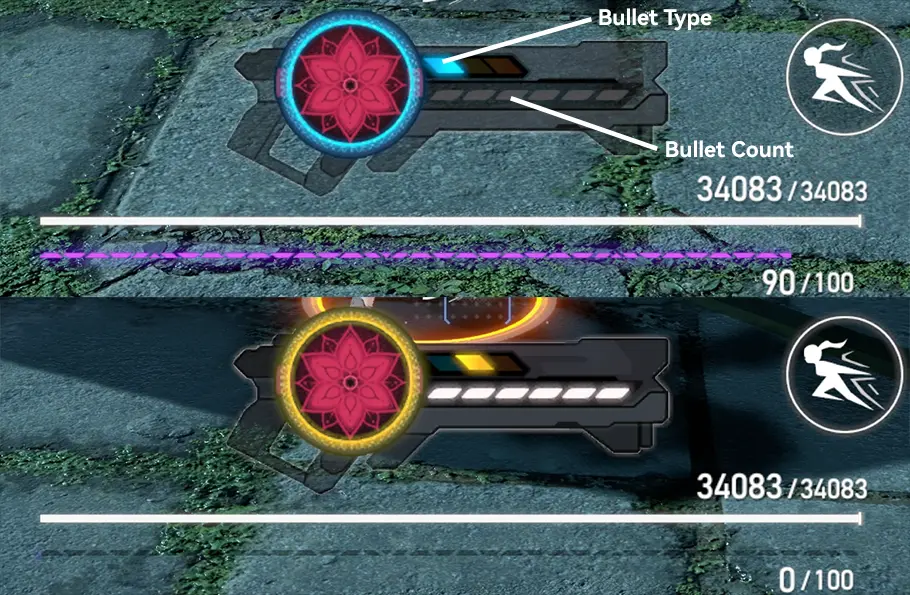
- Wind Bullets - Azure switch: +12% HP recovery, +12 Azure stacks.
- Crimson stack Wind DMG boost: 0.3% → 0.6%.
- Auto-reload: +50% Divine Grace charge speed (12s).
- Yellow Aether Code Immolation: +20% Crit Rate.
Stat Boost Priority:
Skill 3 (Free Alsaid) > Skill 2 (Storm Rampage) > Skill 1 (Gale Dash) > Normal Attack (Dark Tempest) > Ultimate (Wheel of Cleansing)
Rotation:
- DPS:
- Standard (Stacking):
3 AA122AA(Extremity-Dodge) 1AA22 3 21AA 21AA 21AA [AA23AA] loop []. - No Stacking:
3 AA21(Extremity-Dodge)2AA 22 33 [AA23AA] loop [].
- Standard (Stacking):
Breakdown
Amber Stacking Phase:
Steps:
Start with S3 (Free Alsaid) to switch to Amber bullets and reload. Without Divine Sense warp, you begin without Divine Grace, so S3 only switches bullet type.
Quickly use two basic attacks (AA) to trigger the Divine Grace boost, then use S1 (Gale Dash) followed by S2 (Storm Rampage), consuming four bullets and stacking two Amber layers (tracked by petals above the health bar). Use S2 again to stack another Amber layer and gain another Cleansing stack (+25% Divine Grace charge speed buff, Yellow Aether Code). Follow up with multiple Normal Attacks, if timing allows, trigger a Extremity Dodge (just-in-time Move Dodge against enemy attack) to add another Amber layer.
When S1 is off CD, use it again to reach four layers. After four Amber layers, use AA until Divine Grace is full for auto-reload (6 bullets). Quickly use S2 twice to max six Amber layers, this phase should take 10~11s with fast inputs.

Why:
- Amber stacking (+2% DMG per layer, max 6) sets up Crimson stacking and Snow Lotus via Immolation Aether Code.
Crimson Stacking Phase:
Steps:
At 6 Amber layers switch to Crimson bullets with S3 (Free Alsaid).
With Crimson bullets active, Free Alsaid becomes Blooming Waltz; use S2 to consume Amber layers, converting them to Crimson stacks (10 stacks per Amber layer, tracked by petal decrease), follow up with S1, use Normal Attacks as needed to trigger auto-reload then repeat until all petals are consumed (60 Crimson stacks).

Why:
- Crimson (+0.3% Wind DMG per stack) amplifies damage, Blooming Waltz (-2% Wind RES per hit, max 6 stacks) boosts team output. Snow Lotus activates at 50+ Crimson, enhancing S3’s final hit.
How to Adapt:
- Skip to Crimson at five layers against fast bosses to prioritize Blooming Waltz (50 Crimson are enough to trigger Snow Lotus).
Loop Phase:
- Steps:
- Keep AA constant. On auto-reload, use S2 to burst damage and consume three bullets, then S3 (Blooming Waltz) to apply Wind RES debuff. Follow with AA to rebuild Divine Grace. Repeat indefinitely.
- Use Extremity Dodge opportunistically to trigger auto-reload (Flowing Gale’s Crimson effect), follow up with same logic as above.
- Why:
- The loop sustains Blooming Waltz’s debuff and HP draining to max out Savage buff.
- How to Adapt:
- Align S2’s invincibility frames with boss attacks.
- Trigger Extremity Dodge when possible for faster cycles.
- Steps:
Test Data:
(for reference only)
- CN 3.7 Test Server V3, IT8 Dark-metal [Wind], All Characters LvL 80, SS, No Stat Boost
| Team Composition | Clear Time (mm:ss) |
|---|---|
| Support Parvati + Brahmā + Luliang | 1:46 |
| DPS Parvati + Brahmā + Luliang | 1:47 |
| No Functor Parvati + No Functor Brahmā + Functor Luliang | 2:13 |
| Brahmā + Support Parvati + Artemis | 2:17 |
| Brahmā + Support Parvati + Lingguang | 2:18 |
| Brahmā + Kali + Luliang | 2:12 |
- CN 4.0 Test Server V2, IT8 Dark Metal [Wind], All Characters LvL 100, SS, Full Stat Boost
| Team Composition | Clear Time (mm:ss) |
|---|---|
| DPS Parvati + Brahmā + Linyu | 0:44 |
| Support Parvati + Brahmā + Linyu | 0:59 |
![Tempest - Parvati Strategy Review [Aether Gazer] thumbnail](https://box.mimir.cat/images/guides/1089/thumbs/video0.webp)
![[Aether Gazer] Parvati Manual DPS Guide thumbnail](https://box.mimir.cat/images/guides/1089/thumbs/video1.webp)